
There is nothing quite like the panic that sets in at 5:00 PM on a Tuesday when you realize you haven’t started dinner yet.
We have all been there.
You want something healthy. You want something high in protein. But most importantly, you want something that tastes like a cheat meal without the actual guilt.
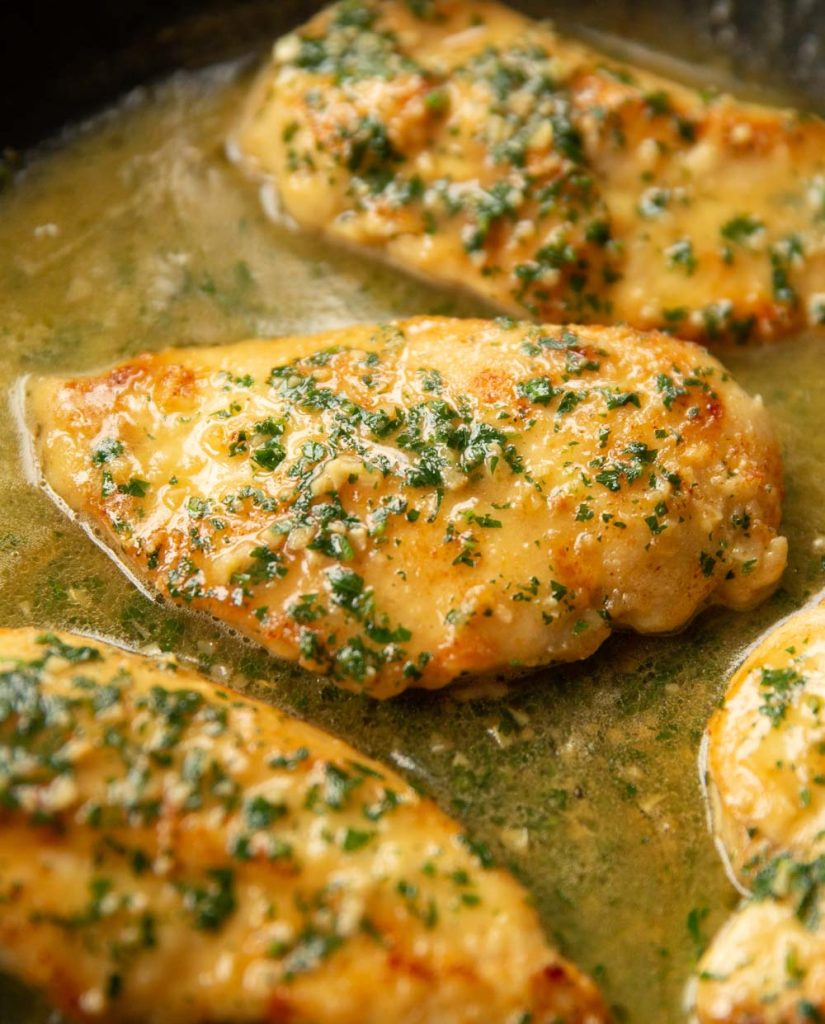
Enter my absolute favorite weeknight savior: Garlic Butter Baked Chicken Breast.
For years, I avoided baking boneless, skinless chicken breasts because they always seemed to come out dry, rubbery, and uninspired. It felt like a punishment rather than a meal.
But after years of testing in my kitchen, tweaking temperatures, and playing with seasoning blends, I have finally cracked the code. This recipe yields juicy, tender chicken that is bursting with savory garlic and rich buttery flavor, yet it remains light enough to fit into your wellness goals.
It’s low-carb, keto-friendly, gluten-free, and absolutely perfect for meal prep.
Let’s get cooking!
Why You’ll Love This Recipe
If you are on the fence about baking chicken breast, let me convince you why this needs to be in your regular rotation.
- Impossible to Mess Up: I use a specific high-heat method combined with a simple preparation trick (pounding the meat) that guarantees juicy results every single time. No more dry chicken!
- Pantry Staples: You likely have every single ingredient in your kitchen right now. No hunting for obscure spices or expensive specialty items.
- Insanely Versatile: This chicken is a chameleon. Serve it with roasted broccoli, slice it over a Caesar salad, shred it for tacos, or toss it into a high-protein pasta.
- Macro-Friendly: This is a protein powerhouse. It’s naturally low in carbohydrates and high in lean protein, making it perfect for Weight Watchers (WW) members or anyone tracking macros.
- One Pan Cleanup: If you line your baking dish with foil or parchment paper, cleanup takes less than 30 seconds. That is my kind of math.
Ingredients Required
The beauty of this recipe lies in its simplicity. Because we are using so few ingredients, the quality and the purpose of each one really matter. Here is exactly what you need and why I use it.
The Essentials
Boneless, Skinless Chicken Breasts This is the star of the show. I recommend buying air-chilled chicken if you can find it; it tends to release less water during cooking, which means better browning and flavor. Look for breasts that are relatively uniform in size so they cook evenly.
- Tip: If your chicken breasts are massive (some are nearly a pound each these days!), slice them horizontally into cutlets.
Unsalted Butter (or Ghee) I always use unsalted butter so I can control the sodium level myself. Butter provides that rich, indulgent mouthfeel and helps carry the garlic flavor into the meat.
- Skinny Swap: If you are strictly watching saturated fat, you can swap this for a high-quality olive oil or a light butter spread, though real butter does brown better.
Fresh Garlic Please, I beg of you, do not use the jarred stuff for this recipe! Since garlic is the primary flavor profile, you want the punch and aroma of fresh cloves. You will need about 4 to 5 cloves, minced finely or pressed.
Smoked Paprika This is my secret weapon. Unlike regular paprika, which is mostly for color, smoked paprika adds a subtle depth and “grilled” flavor without needing a BBQ. It gives the chicken a beautiful golden-red hue.
Dried Oregano & Parsley These herbs provide that classic savory backbone. I use dried herbs for the rub because they don’t burn as easily as fresh herbs in a high-heat oven.
- Tip: Rub the dried herbs between your palms before sprinkling them to release their oils.
Fresh Lemon Juice Acid is essential to cut through the richness of the butter. A squeeze of fresh lemon brightens the whole dish and actually helps tenderize the meat fibers slightly.
Kosher Salt & Black Pepper I exclusively cook with Kosher salt (Diamond Crystal is my brand of choice). It adheres better to the meat than table salt. Freshly cracked black pepper adds that necessary bite.
Variations & Substitutions
Cooking is personal, so feel free to adapt this recipe to your dietary needs or pantry inventory.
- Make it Dairy-Free / Paleo / Whole30: Simply swap the butter for an equal amount of Olive Oil or Avocado Oil. It won’t have that creamy butter taste, but it will still be delicious and juicy.
- Make it Spicy: If your family likes heat, add 1/2 teaspoon of crushed red pepper flakes or a dash of cayenne pepper to the butter mixture.
- The “Cheesy” Twist: In the last 2 minutes of baking, sprinkle some grated Parmesan or Mozzarella cheese on top and broil until bubbly.
- Fresh Herb Finish: If you have fresh parsley, basil, or chives growing in your garden, chop them up and sprinkle them over the finished dish after it comes out of the oven for a burst of freshness.
How to Prepare: The Secret to Juiciness
I am going to walk you through this step-by-step because the technique is actually more important than the ingredients. This is how you transform boring chicken into restaurant-quality food.
Step 1: The Pound Down
This is the step 90% of home cooks skip, and it is the number one reason for dry chicken. Chicken breasts are naturally uneven—thick at one end and thin at the other. If you bake them as-is, the thin end dries out before the thick end is safe to eat.
- Place your chicken breasts on a cutting board.
- Cover them with a piece of plastic wrap (this prevents raw chicken juice from flying around your kitchen—yuck!).
- Using the flat side of a meat mallet (or a heavy rolling pin, or even the bottom of a heavy skillet), gently pound the thickest part of the chicken.
- Goal: You want the chicken to be an even thickness, roughly 3/4-inch thick throughout. This ensures every bite cooks at the exact same rate.
Step 2: The Seasoning Base
Preheat your oven to 400°F (200°C). We want a high temperature to sear the outside quickly and lock in the moisture.
While the oven heats, pat your chicken dry with paper towels. Do not skip this. If the chicken is wet, it will steam instead of bake. We want that nice texture.
Season the chicken generously on both sides with your salt, pepper, smoked paprika, and dried oregano. I like to press the seasoning into the meat with my hand to make sure it sticks.
Step 3: The Garlic Butter Slurry
In a small microwave-safe bowl, melt your butter. Once melted, stir in the minced garlic, parsley, and lemon juice.
- Why do we do this separately? If you just put raw garlic on the chicken, it might burn before the chicken is cooked. By mixing it with the butter, the fat protects the garlic, allowing it to become fragrant and sweet rather than bitter.
Step 4: The Bake
Place your seasoned chicken breasts in a 9×13 baking dish. You don’t want them overcrowding the pan; give them a little breathing room.
Pour that glorious garlic butter mixture over the chicken, ensuring each piece is well-coated.
Bake in the center rack of the oven.
- Timing: For standard 6-7oz breasts that have been pounded even, this will take approximately 18 to 22 minutes.
- Temperature Check: The only way to be 100% sure your chicken is perfect is to use an instant-read meat thermometer. You want to pull the chicken out when it hits 160°F.
- Wait, isn’t 165°F the rule? Yes, but carry-over cooking (the heat remaining in the meat) will raise the temperature another 5 degrees while it rests. If you take it out at 165°F, it will rise to 170°F and be dry. Taking it out at 160°F ensures perfection.
Step 5: The Rest (Crucial!)
Once you remove the pan from the oven, loosely tent it with foil and let it sit untouched for 5 to 10 minutes.
During cooking, the juices migrate to the center of the meat. If you cut into it immediately, those juices will run out onto the cutting board, leaving you with dry meat. Resting allows the juices to redistribute back through the muscle fibers.
Cooking Methods: Beyond the Oven
While I love the oven method for its simplicity, you can make this recipe using almost any appliance in your kitchen. Here is how to adapt it.
Air Fryer Method
The air fryer is fantastic for getting a slightly crispier “crust” on the chicken without breading.
- Preheat Air Fryer to 375°F.
- Prepare chicken as directed (pounding and seasoning).
- Brush the butter mixture onto the chicken before putting it in the basket.
- Cook for 10-12 minutes, flipping halfway through.
- Check internal temp (aim for 160°F) and let rest.
Stovetop (Pan-Seared)
This is great if you want a really nice golden-brown sear.
- Heat a large skillet over medium-high heat. Add half the butter/oil.
- Add seasoned chicken. Cook for 5-6 minutes on the first side without moving it (let that crust form!).
- Flip the chicken. Add the remaining butter and garlic to the pan.
- Turn heat down to medium. Cook for another 5-7 minutes.
- Baste: Spoon the melting garlic butter over the chicken repeatedly as it finishes cooking. This technique (called arroser) is very “chef-y” and adds incredible flavor.
Instant Pot
I don’t typically recommend the Instant Pot for roasted chicken vibes, but it’s great for shredded chicken.
- Add 1/2 cup chicken broth to the bottom of the pot.
- Place chicken on the trivet. Top with the garlic butter mixture.
- Seal and cook on High Pressure for 8 minutes.
- Quick release the pressure.
- The texture will be softer, more poached—perfect for shredding into soups or tacos.
Slow Cooker
This method yields very tender chicken, though you lose the texture of baked meat.
- Place chicken in the bottom of the slow cooker.
- Pour garlic butter mixture over top.
- Cover and cook on Low for 3-4 hours or High for 1.5-2 hours.
- Be careful not to overcook; chicken breasts can turn mealy in a slow cooker if left too long.
Storage & Meal Prep
One of the main reasons I make this recipe is for meal prep. I will often bake 3 or 4 pounds of chicken on Sunday to use throughout the week.
How to Store
- Refrigerator: Store leftovers in an airtight container in the fridge for up to 3 to 4 days.
- Freezer: This chicken freezes beautifully! Let it cool completely, then slice it or leave it whole. Place in a freezer-safe bag or container. It will last for up to 3 months.
- Tip: Freeze individual portions with a little bit of the pan juices so it stays moist when thawed.
Reheating Rules
The microwave is the enemy of chicken breast. It works by exciting water molecules, which essentially steams the moisture right out of the meat, turning it into rubber.
- Best Way (Stovetop): Place chicken in a skillet with a splash of chicken broth or water. Cover with a lid and heat on low-medium until warmed through. The steam helps re-hydrate the meat.
- Oven: Place chicken in a dish, add a splash of broth, cover with foil, and heat at 350°F for about 10-15 minutes.
- Microwave (If you must): Slice the chicken first. Drizzle with a little water or oil. Cover with a microwave-safe lid or damp paper towel. Heat at 50% power in 30-second intervals. Do not blast it on high!
Meal Prep Ideas
- The Salad Bowl: Cold garlic butter chicken is delicious on a bed of arugula with cherry tomatoes, cucumbers, and a balsamic glaze.
- The Grain Bowl: Pair sliced chicken with quinoa, roasted sweet potatoes, and avocado.
- The Wrap: Toss chopped chicken with a little Greek yogurt, celery, and hot sauce for a healthy buffalo chicken wrap.
Comprehensive FAQ Section
I know cooking chicken can be intimidating for some, so I’ve compiled the most common questions I get from readers to help you troubleshoot.
1. My chicken always releases a white goo while baking. What is that? That white stuff is just protein (albumin). It’s totally safe to eat! It usually happens when the chicken is cooked too fast or overcooked, causing the muscle fibers to contract and squeeze out moisture containing the protein. Pounding the chicken and not overcooking it helps prevent this.
2. Should I wash my chicken before cooking? No! The CDC and food safety experts strongly advise against washing raw poultry. It doesn’t kill bacteria; instead, the splashing water spreads raw chicken bacteria (salmonella) all over your sink, faucet, and countertops. The heat of the oven is the only thing that kills bacteria.
3. Can I use frozen chicken breasts? You can, but you cannot bake them from frozen with this specific recipe and expect good results. The butter will burn before the inside is cooked. Thaw your chicken overnight in the fridge or use the “defrost” setting on your microwave before starting the recipe.
4. Why is my chicken tough? Tough chicken usually means one of two things: it was overcooked (internal temp went way past 165°F) or it wasn’t rested. Remember, chicken breast is a very lean muscle. It doesn’t have fat to keep it moist like a thigh does, so temperature precision is key.
5. Can I use chicken thighs instead? Absolutely! I love chicken thighs. They are more forgiving and naturally juicier. If using bone-in, skin-on thighs, you will need to bake them longer—usually 35 to 40 minutes at 400°F. If using boneless, skinless thighs, the timing is similar to breasts (maybe add 2-3 minutes).
6. Do I need to marinate this chicken? This recipe is designed to be a “rub and bake” method, so no long marinating time is needed. However, if you want to prep it in the morning, you can toss the chicken in the seasoning and garlic butter and let it sit in the fridge all day. The flavors will be even deeper!
7. Is this recipe gluten-free? Yes, naturally! Just double-check your spices to ensure they are not processed in a facility with wheat, but generally, all ingredients here are gluten-free.
8. What sides go best with this? To keep it “Skinnytaste” friendly, I love serving this with:
- Roasted Asparagus with Lemon
- Cauliflower Mash (a great low-carb sub for mashed potatoes)
- Zucchini Noodles (Zoodles)
- A crisp Cucumber and Tomato Salad
9. Can I double the recipe? Yes, easily. Just use a larger baking sheet or two dishes. Ensure the chicken pieces aren’t overlapping, or they will steam rather than roast.
10. How do I make the garlic butter sauce thicker? The sauce in the pan is mostly melted butter and chicken juices (jus). If you want a thick gravy, pour the pan juices into a small saucepan, mix 1 teaspoon of cornstarch with 1 tablespoon of cold water, whisk it into the juices, and simmer for 2 minutes until thickened.
Recipe Card Summary
Here is the quick breakdown for those of you ready to get cooking!
Prep Time: 10 minutes Cook Time: 20 minutes Resting Time: 5 minutes Total Time: 35 minutes Servings: 4
Nutrition Highlight (Per Serving)
- Calories: ~280 kcal
- Carbohydrates: 2g (Low Carb!)
- Protein: 26g
- Fat: 18g (can be reduced by reducing butter)
- Fiber: 0.5g
Instructions Recap
- Preheat oven to 400°F.
- Pound chicken breasts to even thickness.
- Season dry chicken with salt, pepper, paprika, oregano.
- Mix melted butter, garlic, parsley, lemon.
- Pour butter mixture over chicken in a baking dish.
- Bake 18-22 minutes (until 160°F).
- Rest for 5-10 minutes before slicing.
I hope this Garlic Butter Baked Chicken becomes a staple in your home just like it is in mine. It’s proof that eating healthy doesn’t mean eating boring food.
Let me know in the comments how you served it!