Hi guys! If you’ve been following me for a while, you know that I am absolutely obsessed with recreating my favorite takeout dishes at home.
There is something so satisfying about taking a meal that is usually loaded with oil, sugar, and sodium, and turning it into something light, healthy, and nutritious—without sacrificing a single ounce of flavor.
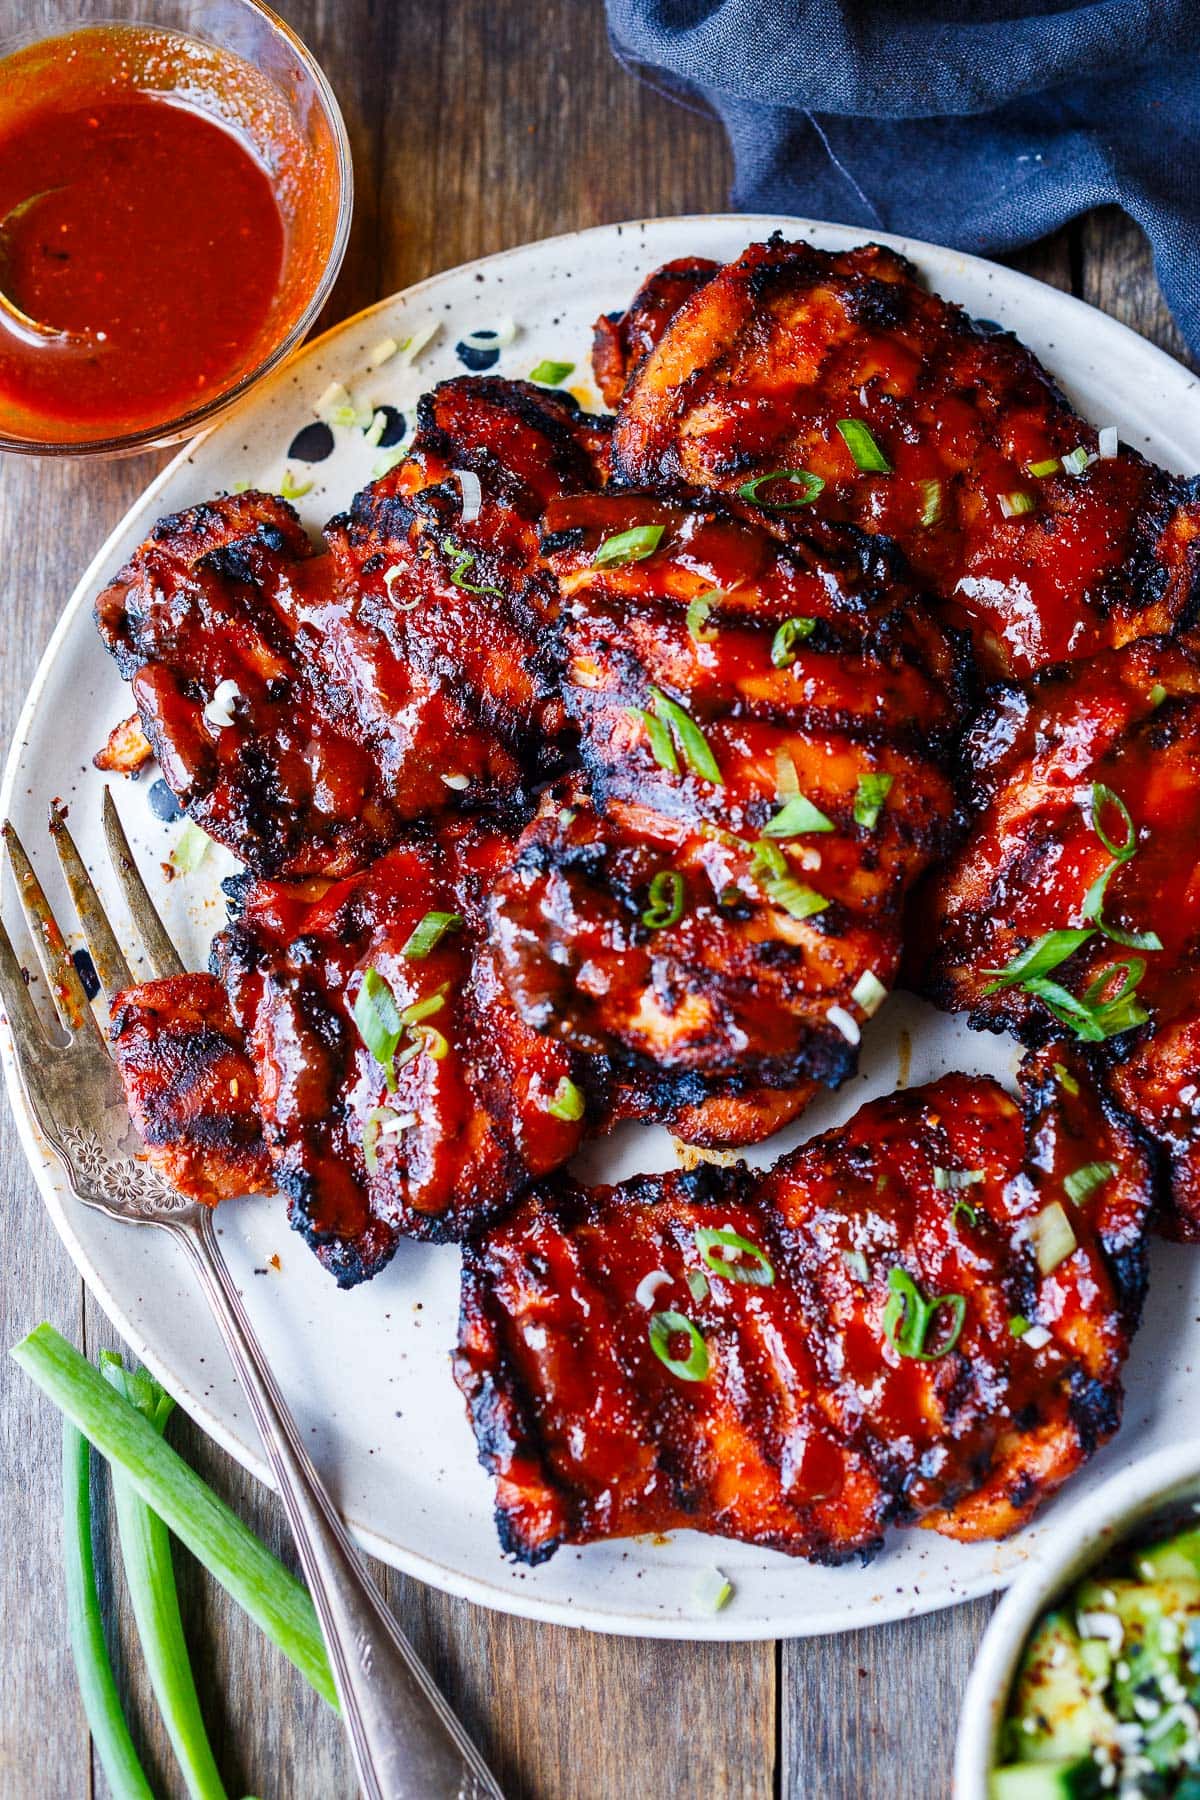
Today, we are diving into one of my absolute favorite flavor profiles: Korean BBQ.
Specifically, we are making a sticky, sweet, and spicy Korean Chicken Breast that comes together in less than 30 minutes.
This isn’t just plain old grilled chicken.
It’s coated in a savory glaze made from Gochujang (more on that later!), garlic, and ginger.
It’s perfect for meal prep.
It’s family-friendly (if you adjust the heat!).
And best of all, it fits perfectly into a balanced lifestyle, whether you’re counting macros, watching your points, or just trying to eat more real food.
Let’s get cooking!
Why You’ll Love This Recipe
I know chicken breast can get a bad rap for being dry or boring, but trust me, this recipe changes everything. Here is why this is about to become a staple in your weekly rotation:
- Flavor Bomb: The combination of fermented chili paste, soy sauce, and aromatics creates a depth of flavor that tastes like it simmered for hours, even though it’s a quick stir-fry.
- High Protein, Low Fat: By using boneless, skinless chicken breast and controlling the amount of oil, we keep this dish incredibly lean while packing in over 25g of protein per serving.
- Pantry Staples: Aside from the Gochujang (which lasts forever in the fridge), you likely have everything else in your pantry right now.
- Versatile Cooking Methods: Whether you love your Air Fryer, swear by your Instant Pot, or just want to use a skillet, I’ve included instructions for every method below.
- Meal Prep Friendly: This chicken actually tastes better the next day after the flavors have had time to meld, making it the perfect candidate for your Sunday meal prep bowls.
- Customizable Heat: You are in total control of the spice level. You can make it mild enough for the kids or spicy enough to clear your sinuses!
Ingredients Required
To get that authentic Korean flavor while keeping things “skinny,” we need to be intentional about our ingredients. Here is exactly what you need and why we use it.
The Protein
- Boneless, Skinless Chicken Breast: I use about 1.5 lbs. I recommend buying air-chilled chicken if you can find it; it releases less water during cooking, which means you get a better sear and more concentrated flavor.
- Cornstarch (or Arrowroot Powder): This is a key step! We lightly dust the chicken in cornstarch before cooking. This technique, often called “velveting” in Asian cuisine, helps seal in the juices and gives the sauce something to cling to.
The Sauce (The Star of the Show)
- Gochujang (Korean Chili Paste): This is the non-negotiable ingredient. Gochujang is a fermented red chili paste that is savory, sweet, and spicy all at once. It provides that signature “umami” punch.
- Tip: Look for it in the Asian aisle of your grocery store or at H-Mart. It usually comes in a red tub.
- Low-Sodium Soy Sauce: I always use low-sodium to control the salt content. If you are Gluten-Free, swap this for Tamari or Coconut Aminos.
- Fresh Ginger & Garlic: Please, please use fresh if you can! The jarred stuff just doesn’t compare when you’re making a sauce this simple. You want that spicy kick from the fresh ginger root.
- Rice Vinegar: This adds acidity to cut through the sweetness and spice.
- Sesame Oil: A little goes a long way. We add this at the end or in the marinade for that nutty aroma. Toasted sesame oil is best.
- Honey or Maple Syrup: To balance the heat of the chili paste, we need a natural sweetener. I prefer honey for its floral notes and sticky consistency, which helps glaze the chicken.
- Water or Chicken Broth: To thin the sauce out slightly so it doesn’t burn in the pan.
Garnishes (Optional but Recommended)
- Toasted Sesame Seeds: For crunch and visual appeal.
- Scallions (Green Onions): The fresh oniony bite balances the rich sauce.
Variations & Substitutions
- Make it Vegan: Swap the chicken for firm tofu (pressed and cubed) or cauliflower florets. Use maple syrup instead of honey.
- Make it Gluten-Free: Ensure your Gochujang is certified GF (some brands contain wheat) and use Tamari instead of soy sauce.
- Make it Paleo/Whole30: Use coconut aminos instead of soy sauce, arrowroot instead of cornstarch, and date paste instead of honey (omit Gochujang for Whole30 as it usually contains sugar/soy, and use a mix of chili powder and cayenne instead).

How to Prepare
Preparing this dish is incredibly simple, but following the steps correctly ensures your chicken is juicy, not rubbery. Here is my step-by-step guide to the perfect easy Korean chicken breast.
Step 1: Prep the Chicken
The biggest mistake people make with chicken breast is cooking it unevenly. If your chicken breast is thick on one end and thin on the other, one side dries out before the other is cooked.
- Cut into bite-sized pieces: I prefer cutting the chicken into 1-inch cubes. Try to keep them uniform in size.
- Dry it: Pat the chicken dry with paper towels. Moisture is the enemy of a good sear.
- Season: Sprinkle with a pinch of salt and black pepper.
- Coat: Toss the chicken cubes in the cornstarch. You want a light dusting, not a thick batter. Shake off any excess.
Step 2: Make the Sauce
In a small bowl or a mason jar, whisk together your sauce ingredients:
- 2 tablespoons Gochujang
- 2 tablespoons Low-Sodium Soy Sauce
- 1 tablespoon Honey
- 1 tablespoon Rice Vinegar
- 1 teaspoon Sesame Oil
- 1 tablespoon minced fresh Garlic
- 1 teaspoon grated fresh Ginger
- 2 tablespoons Water
Whisk until the Gochujang is fully dissolved and the sauce is smooth. Taste it! If you want it sweeter, add a little more honey. If you want it spicier, add a pinch of red pepper flakes or more paste.
Step 3: Sear the Chicken
Heat a large non-stick skillet or wok over medium-high heat. Add a spray of oil (I use avocado oil spray or a teaspoon of olive oil).
- Add the chicken in a single layer. Do not overcrowd the pan. If you put too much chicken in at once, it will steam instead of sear. You might need to do this in two batches.
- Let it cook undisturbed for 2-3 minutes until golden brown on the bottom. Flip and cook for another 2-3 minutes until the chicken is almost cooked through.
Step 4: Glaze and Simmer
Once the chicken is browned:
- Pour the sauce directly into the pan over the chicken.
- The sauce will bubble up immediately (this smells amazing!).
- Toss the chicken continuously in the sauce. Because of the cornstarch on the chicken and the sugar in the honey, the sauce will thicken rapidly.
- Cook for 1-2 minutes until the sauce creates a sticky, glossy glaze that coats every piece of chicken.
Step 5: Garnish and Serve
Remove from heat immediately so you don’t overcook the meat. Top with sliced green onions and toasted sesame seeds. Serve hot!
Cooking Methods
While the stovetop method is my go-to for that quick sear, I know you guys love your kitchen gadgets! Here is how to adapt this recipe for different appliances.
Air Fryer Method (Crispiest Result)
If you want that “fried chicken” texture with minimal oil, the Air Fryer is the winner.
- Preheat your Air Fryer to 400°F (200°C).
- Toss the seasoned, cornstarch-coated chicken with a little oil spray.
- Place chicken in the air fryer basket in a single layer (cook in batches if needed).
- Air fry for 8-10 minutes, shaking the basket halfway through.
- While the chicken cooks, simmer the sauce in a small saucepan on the stove until slightly thickened.
- Toss the crispy air-fried chicken in the warm sauce in a large bowl.
Instant Pot Method (Best for Shredded Chicken)
This is great if you want “pulled” chicken for tacos or rice bowls. Note: Skip the cornstarch for this method.
- Place whole chicken breasts in the Instant Pot.
- Pour the sauce ingredients over the chicken (add an extra 1/4 cup of water to prevent the burn error).
- Close the lid, set the valve to Sealing.
- Cook on High Pressure for 8 minutes.
- Let the pressure release naturally for 5-10 minutes, then quick release.
- Remove chicken and shred with two forks.
- Turn the Instant Pot to Sauté mode and simmer the remaining sauce with a cornstarch slurry (1 tsp cornstarch + 1 tbsp water) until thick. Return chicken to the pot and coat.
Slow Cooker Method (Set It and Forget It)
- Place whole chicken breasts in the slow cooker.
- Whisk the sauce ingredients (omit the water) and pour over the chicken.
- Cover and cook on LOW for 3-4 hours or HIGH for 1.5-2 hours. Chicken breast dries out fast in a slow cooker, so check it early!
- Shred the chicken or dice it.
- If the sauce is too thin, transfer it to a saucepan and boil it down, or stir in a cornstarch slurry directly into the slow cooker on high for the last 20 minutes.
Oven Baked Method (Best for Large Batches)
- Preheat oven to 400°F (200°C).
- Place cornstarch-coated chicken pieces on a parchment-lined baking sheet. Spray with oil.
- Bake for 15-20 minutes, flipping halfway through.
- While baking, simmer the sauce on the stovetop until thick.
- Toss the baked chicken in the sauce before serving.
Storage & Meal Prep
This recipe is a meal prep champion. The flavors of the Gochujang and ginger actually deepen as they sit.
Refrigerator: Store leftovers in an airtight glass container for up to 4 days.
- Reheating Tip: Microwave on high for 60-90 seconds. I like to sprinkle a few drops of water over the chicken before covering it to reheat; this creates steam and prevents the chicken from getting rubbery.
Freezer: Yes, you can freeze this!
- Cooked: Allow the chicken to cool completely. Freeze in a freezer-safe bag or container for up to 3 months. Thaw in the fridge overnight before reheating.
- Raw (Freezer Meal): You can place the raw, cubed chicken and the marinade in a freezer bag. Freeze for up to 3 months. When ready to eat, thaw completely, toss the chicken in cornstarch (after removing from marinade? No, for this method, skip the cornstarch or add it during cooking), and sauté. Actually, for the best texture, I recommend freezing the sauce and chicken separately, or just freezing the cooked dish.
Serving Suggestions for Meal Prep: To keep things low carb, I love serving this over:
- Cauliflower Rice: Roasted or sautéed.
- Zucchini Noodles: For a fun texture.
- Steamed Broccoli or Bok Choy: The sauce acts as a dressing for the veggies.
If you aren’t watching carbs, this is heavenly over fluffy Jasmine rice or brown rice.
Comprehensive FAQ Section
I get a lot of questions about Asian-inspired cooking and ingredient swaps, so I’ve compiled the most common ones here to help you succeed!
1. Is this recipe spicy? It has a kick, but it’s not overwhelming. Gochujang ranges in heat levels (look at the packaging—it usually indicates mild, medium, or hot). The honey and butter/oil in the recipe help mellow out the spice. If you are very sensitive to spice, use half the amount of Gochujang and supplement with a little tomato paste for color and body.
2. Where can I find Gochujang? Most major grocery stores (Whole Foods, Kroger, Publix, Wegmans) now carry it in the Asian or International aisle. It comes in a red tub or a squeeze bottle. If you can’t find it locally, Amazon carries great brands like Mother-in-Law’s or CJ Haechandle.
3. Can I use chicken thighs instead of breasts? Absolutely! In fact, chicken thighs are more forgiving and stay juicier. If you use boneless, skinless thighs, just trim the visible fat. You might need to cook them for 1-2 minutes longer than the breasts.
4. My sauce is too runny. What did I do wrong? You likely didn’t simmer it long enough or didn’t use enough cornstarch on the chicken. The cornstarch on the chicken helps thicken the sauce. If it’s still runny, mix 1 teaspoon of cornstarch with 1 tablespoon of cold water, pour it into the simmering pan, and stir. It will thicken instantly.
5. Is this recipe Gluten-Free? Not automatically. Gochujang often contains wheat or barley malt. You must buy a specific Gluten-Free Gochujang (like the brand Wholly Gochujang) and use Tamari instead of soy sauce to make this safe for Celiacs.
6. Can I prep this the night before? Yes! You can cut the chicken and mix the sauce the night before. Store them in separate containers in the fridge. When you come home from work, just coat the chicken in cornstarch and cook. Dinner will be ready in 10 minutes.
7. How do I stop the chicken from sticking to the pan? Make sure your pan is hot before adding the oil, and the oil is hot before adding the chicken. Also, don’t try to flip the chicken too early. If it’s sticking, it hasn’t formed a crust yet. Give it another 30 seconds.
8. What vegetables go well with this? I love adding veggies directly into the stir fry to make it a one-pan meal. Great options are red bell peppers, snap peas, broccoli florets, or sliced carrots. Add them to the pan after the chicken is browned but before you add the sauce.
9. Can I use powdered ginger and garlic? In a pinch, yes. Use 1/4 teaspoon of powder for every tablespoon of fresh. However, I highly recommend fresh for the “zing” it gives the sauce.
10. Is this recipe Weight Watchers (WW) friendly? Yes! Chicken breast is zero points on many plans. The points will come from the honey, cornstarch, and sesame oil. To lower the points/calories, you can use a brown sugar substitute (like Swerve or Monkfruit) instead of honey, and reduce the sesame oil to 1/2 teaspoon.
Recipe Card Summary
Here is the quick breakdown for those of you ready to get into the kitchen!
Yields: 4 Servings Prep Time: 10 mins Cook Time: 10 mins Total Time: 20 mins
Nutrition Highlight (Per Serving)
- Calories: ~240 kcal
- Protein: 26g
- Carbohydrates: 14g
- Fat: 6g
- Fiber: 0.5g
- Sugar: 8g
Ingredients
- 1.5 lbs Boneless Skinless Chicken Breast, cut into 1-inch cubes
- 2 tbsp Cornstarch
- Salt and Black Pepper
- 1 tsp Olive Oil or Avocado Oil Spray
- Sauce:
- 2 tbsp Gochujang (Korean Chili Paste)
- 2 tbsp Low-Sodium Soy Sauce
- 1 tbsp Honey
- 1 tbsp Rice Vinegar
- 1 tsp Sesame Oil
- 1 tbsp Fresh Garlic, minced
- 1 tsp Fresh Ginger, grated
- 2 tbsp Water
Instructions
- Season: Pat chicken dry. Season with salt and pepper. Toss in cornstarch to coat lightly.
- Mix: Whisk all sauce ingredients in a small bowl.
- Sear: Heat oil in a large non-stick skillet over medium-high heat. Add chicken in a single layer. Cook 3-4 minutes per side until golden and cooked through.
- Simmer: Pour sauce over chicken. Toss to coat. Simmer for 1-2 minutes until sauce is sticky and thick.
- Serve: Garnish with sesame seeds and scallions. Serve over rice or cauliflower rice.
Final Thoughts
I really hope you guys give this Easy Korean Chicken Breast recipe a try. It’s one of those meals that makes you feel like a chef without the stress.
It’s sticky, savory, sweet, and just the right amount of spicy.